Student Cloud Printing Instructions

This guide provides instructions on setting up and using cloud printing services on both Mac and Windows devices. It outlines the steps required to configure cloud printing, ensuring accessibility and ease of use for various users.

Cloud printing enables users to print documents remotely without needing a direct connection to the printer. This is particularly useful in office environments, educational institutions, and remote work settings where seamless printing capabilities improve efficiency, including where printing during a class isn’t feasible nor available.

Cloud Printing (Windows)


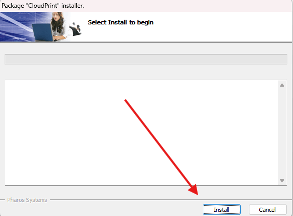
Step 1: Install the Cloud Printing Software

  • Open and run the download.
  • When prompted, allow the software to make changes to your device.
  • Your computer may ask for admin credentials for this process. In the event that this happens, entering your computer login information should work.
  • Press Install and wait for the installation to complete.
  • Click Finish when the installation is done.
  • Now go to After Installation for the printing steps

Cloud Printing (Mac)

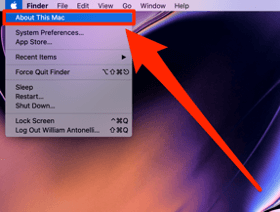
Step 1: Determine Operating System
Requirements: macOS 64-bit version 10.14, 10.15, 11, and 12 or newer.

  • Select the Apple icon in the upper left corner.
  • Click About This Mac.
  • If the Operating System is below 10.14, you will need to upgrade before installing the cloud printer.

Step 2: Install Pharos Popup Client

  • Download the Popup Client from the provided link. (https://itsvc.eku.edu/Popup.dmg)
  • Open the Downloads folder.
  • Select Mac OS X Popup.
  • Open Popup.dmg.
  • Select Continue on the next two screens.
  • Click Install.
  • Once installation is complete, click Close.

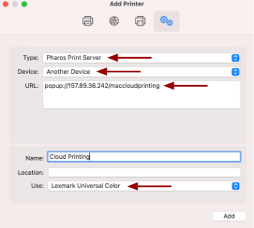
Step 3: Install Cloud Printer

  • Select the Apple icon in the upper left corner.
  • Go to System Preferences.
  • Click Printers & Scanners.
  • Select the + icon in the lower-left corner (may vary depending on Mac OS version).
  • Click Add Printer or Scanner.
  • Right-click while holding the Command button in the empty space of the toolbar.
  • Select Customize Toolbar.
  • Drag the Advanced icon to the toolbar and click Done.
  • Select Advanced, then change the following:
  • Type: Pharos Print Server
  • Device: Another Device
  • URL: popup://157.89.36.242/MACCLOUDPRINTING
  • Name: Cloud Printer
  • Click the Use: dropdown and select Software.
  • If a Lexmark Mono Universal driver is not available, download and install it using the provided link. (https://downloads.lexmark.com/downloads/drivers/Lexmark_UM1_PrinterSoftware_08042022.dmg)
  • Once installed, go back and select the Lexmark Mono driver from the list.
  • Click Add and then Configure when prompted.
  • Check Duplexer and Tray 1, then hit OK.
  • Now go to After Installation for the printing steps

After Installation


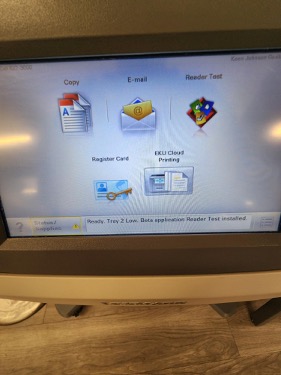
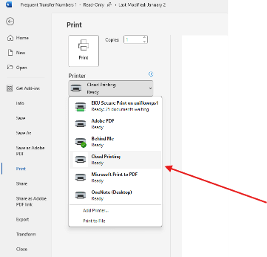
Step 1: Open the Print Menu

  • Open the Print menu in your document or application.
  • Go to Print settings and select Printers.
  • Choose Cloud Printing from the list of available printers.

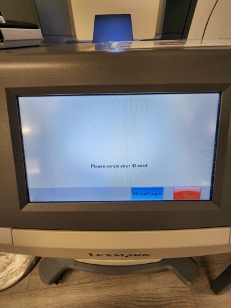
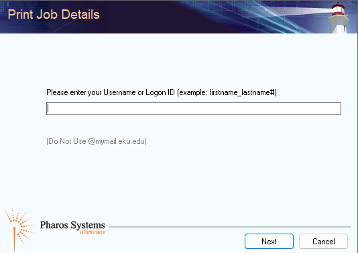
Step 2: Authenticate Your Account

  • When you press Print, a login prompt will appear.
  • Enter your student username in the format: firstname_lastname## (where ## represents any assigned numbers if applicable).
  • Enter your EKU password (the same one used for all EKU logins).
  • If the credentials are correct, you will see a confirmation message stating Print job sent successfully.
  • If incorrect, an error message will indicate login failure, if you haven’t reset your password in 3 months or more, this error will also happen.

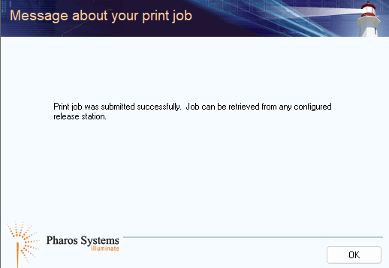
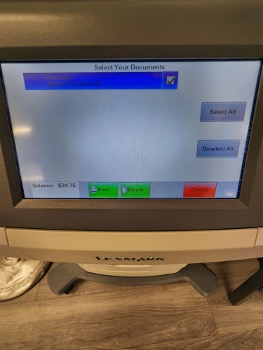
Step 3: Retrieve Your Print Job

  • Go to any Cloud Printing printer on campus. Notable locations include:
  • Library
  • Keen Johnson Basement (IT Department)
  • Wallace
  • At the printer, select Cloud Printing.
  • Swipe your EKU ID card or tap your eAccount on your phone over the scanner.
  • A list of available print jobs will appear.
  • A note is that you will have 25$ every semester to use, and if you need more, your balance will go into the negative and you will be charged the difference at the end of semester.
  • Select the document you wish to print and press Print.
  • Your document will print successfully!